Friday, August 23, 2024

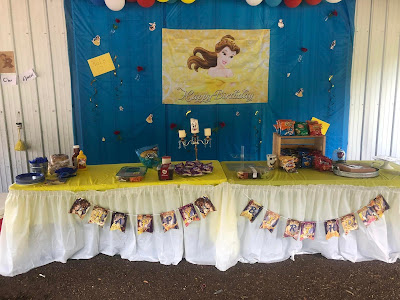
Beauty and the Beast Birthday Party

 Beauty and the Beast Birthday Party 

Chip. I used a Dollar Tree white cup. It wasn't the exact shape I needed, but all I could find. Also, it was glazed and very hard to paint! I used Sharpie markers. I added a cardboard collar on the bottom and used markers. Also added a gold braid trim. I had spray painted the handle.


Dollar Tree mirror spray painted shiny gold


Dollar Tree mirror upside down vase over a silk rose with lights and a wooden rose with a candle inside painted red


Dollar tree candelabras with “arms”

Sultan castle dog made from a tray with a pillow on top, red napkin tied with a gold scarf. 


Lumiere candelabra with candle in middle wrapped in cellophane that I drew his face on. My silver candelabra needed polishing but left it tarnished to look gold!


Lumiere’s girlfriend feather duster, handle painted gold,  empty Keurig cup with painted face.

Food


Wednesday, May 15, 2019

Piano Recital Food 2018

 Kit Kat Piano
Use dark chocolate snack Kit Kats and regular sized white chocolate bars for the white keys.

 Vintage Record Cupcake Stand 
Similar to this one. I hot glued Dollar Tree plastic bowls for the bottom stand and took apart plastic wine glasses to glue between them. It was a little shaky.

 I  bought a plastic divided tray at Dollar Tree and made my own fruit tray.


Easy Gluten/Dairy Free Fudge.
Microwave a container of Duncan Hines Classic Chocolate Frosting for 1 minute. Stir in a cup of peanut or almond butter and microwave again. Stir. Pour into greased pan. Refrigerate.

Vintage Record Plates
I used small black plates, printed and cut out the centers with names of students, time and place, put slightly larger  adhesive laminate circles over the, centers.


Sunday, October 11, 2015

New baby granddaughter!

I was blessed to witness the birth of my first baby granddaughter (I also have an adopted granddaughter who came to us at age 8) in June. I made a pinterest page for baby shower ideas baby gifts. I posted a lot of sewing and no-sewing ideas. I just love Pinterest!
I recently found this site-- 25 free baby dresses.  Hope you find something you can use!

Diaper Burp Cloths 
A coworker monogrammed all these for me. to give Kylie. I love them! She added material at the bottom of one side of the diaper.

She made this one for my great-nephew


Monogrammed onsie
Monogrammed blanket


Fancy Gown I made from a plain gown & headband I made
I ordered a plain gown from eBay (couldn't find any in stores). I wanted pink, but found lilac.  I bought a roll of polkadot tulle from JoAnne's and fused the edges down the center to the ruffle. I fused ruffled lace on the sleeves, neck and bottom. I hot glued a flower I found at Walmart in the sewing department. I also got the headband and the lace there.

Sunday, August 31, 2014

Piano Recital Goodies


Fun food for my piano recital included:


Chocolate and White Chocolate Kit Kat Keyboard
Twizzler quarter notes


White Donut Whole Notes

Tornado!


Nick Alexander caught this funnel cloud or slow moving tornado on his iPhone! It wasn't far from my home!


Monday, July 22, 2013

Clay Pot Birdbath


I saw the idea for a clay pot bird bath on Pinterest and decided to do one myself. I bought 4 pots about 8" diameter at Walmart for $2.50 each. I glued them together with E6000 glue ($2.97 for 2 ounces) that I found at Walmart The saucer, 16" was $14.97 at Home Depot, Walmart didn't have any. I used Rust-Oleum American Accents Stone spray paint. It's $7.97 at Walmart, and took a little over one can. So the entire project can be done for under $45. If you happen to already have the pots I suppose it would be more of a recycle project. WARNING... I just found out this paint is NOT waterproof! UGH I hope that a sealer will fix this problem. After a big rain today I saw that the paint on the edges had washed off. You need to use outdoor paint, or seal it!!


To make:


Put glue on the bottom of one pot, turn the other upside down, let dry, put glue on the lip of the top pot.


Amazing E-6000 Craft Glue, 2 oz
Turn the next one upside down and wiggle into place; look all around to make sure the edges match. They won't be perfect. Let dry.

Glue the bottom of the top pot and add last pot. Let dry.


The best way to make sure you center the pots on the saucer is to put it upside down on a level, sturdy surface. You can get a pencil and outline the pot onto the saucer to make sure it is centered, you could even measure the sides, but I just went ahead and glued the lip of the top pot and turned it upside down onto the saucer. Let dry. I waited overnight, but you probably don't have to.


Take the entire thing outside. Place it on plastic to keep the dirt off the bottom. If there are any rough places, use very fine sandpaper gently. Spray paint in a sweeping motion. Let dry. Repeat until covered. Do it in layers or it will make a mess! Don't rush.

Turn it upside down when it is completely dry. Be sure to get in the spaces between the pots. This stuff seems to stay sticky and will come off if gently scraped. I think I'm going to have to add a sealer. It also says it contains lead, which does not make me real happy. I think I'm going to get a plastic liner so I don't kill any birds...


Place on a flat surface. I planted a muscadine vine near it and added a flower and some cute owls I found at Big Lots. Gardening things are on clearance in many places right now!

Finished bird bath  by Wynne

Wednesday, June 12, 2013

Dinosaur Birthday Party


My Grandson's Dinosaur Birthday Party


Goodie bags full of the Animal Planet candy. 

This is the info on my grandson's 6th birthday party. For the goody (goodie?) bags I used colored lunch bags. Fold top over. Glue on eyes (white circles and half circles a little larger), use marker to make pupils and nostrils. Cut "teeth" triangles at edge of the folded over top, add dinosaur arms/hands and dinosaur eggs. Staple or add yarn handle. I'm sure there was a better way to do this, but I got the idea from a pic somewhere online.


Dinosaur Crossing sign: Choose or cut a square of cardboard. Cut yellow paper same size. I found a dinosaur from color sheets online and made a pattern by directly copying it off the computer, but you could print one out for a pattern. Choose a simple picture. Cut it out of black construction paper. Use marker to write Dinosaur Crossing. Laminate if possible. Hot glue to the cardboard. Buy or make a wooden post. I happened to have a sign post from a Halloween decoration. I screwed the sign onto the post, then hammered it into the dirt by the walkway.


Pinata or decoration Dinosaur Egg. I made a paste of flour and water and wrapped a balloon to make a paper mache egg. I spray painted it yellow because that is the color paint I had. I bought these blow up dinosaurs at the Dollar Tree. You could put one in the egg, then blow it up and have it hatch at the party! I found the cottony green fake Easter grass at Joann's. The dinosaurs around it were bought at Dollar General.

Food


We had Dinosaur Bones, Dinosaur Claws (Bugles), chocolate "mud" brownies, individual bowls of ice cream, trail juice--Capri Sun and KoolAid Jammers, the usual chips and dip, a lot of Animal Planet candy like dinosaur eggs and suckers that I found at Big Lots. Actually that find is what led me to the theme. The only thing we didn't do theme-wise was the cake, because it was ordered before we decided on the theme.

Animal Planet Candy


Dinosaur Bones

Assembled Dinosaur Bones
Marshmallows and Big Pretzel Sticks
White Chocolate Covered
Dinosaur Bones


ACTIVITY

We were at a park, so there were swings and such. They had their binoculars to be on the lookout for a dinosaur near the Dinosaur Crossing Sign. They found one--the pinata!

Dinosaur Pinata, formerly a Sun Pinata

The only pinatas I could find here were a sun and some girlie pink one. When I saw the rays on the sun I thought, "spikes!" I cut one entirely off and folder the cardboard in. Then I glued blue tissue paper on top of the yellow. I cut rows of fringe and glued them across and down in two triangles for feet. I added the eye. This is the finished pic (at my house). They were so funny hitting the poor thing. They didn't even stop when the candy came out, they beat it til there was nothing but little pieces left and even broke the stick, which was an old tool handle! After they destroyed it they flew, or tried to fly dinosaur kites I bought at the Dollar Tree. They had a great time with them, too!
Binoculars

Here's how I made the toilet tissue roll binoculars:
1. Spray paint toilet paper tubes, or cover them in paper--wallpaper, wrapping paper, shelf liner.
2.Cover the ends in colored plastic wrap. Tape tightly.


3. Cover the raw, taped edges with painter's tape or masking tape. 
4. Punch holes on opposite sides. 


4.Wrap yarn around a ruler to desired length ( I cut mine about 30") and cut.
5.Thread yarn through the holes and tie knots on the inside of the tubes.
6. Put stapler inside the tubes (a tight fit) and staple a couple of times. I found it easier to lay this with stapler upside down on the table. You might want to hot glue them before stapling so they'll stay.
7. As kids arrived I gave them the binoculars and let them put dinosaur and happy birthday stickers on them for decoration.


GRRR Jude had a gigantic time!